Highlighting a region or a state on a C1Maps control by restricting bounds is simple and can be accomplished by setting four properties:
This property pair controls the left and right map boundaries, specified by longitude.
This property pair controls the top and bottom map boundaries, specified by latitude.
You can set these properties in XAML markup, in code, or at design time in the Properties window. In the following examples, the boundaries being set will highlight California.
Edit your <C1:C1Maps/> tag so that it resembles the following. This will set the latitude values to the upper and lower state borders of the state of California. The longitude values are set so that they are slightly outside the state borders of California:
| XAML |
Copy Code
|
|---|---|
<C1:C1Maps x:Name="maps" MaxLatValue="44" MinLatValue="32" Center="-121.224,37.8897" MaxLongValue="-112" MinLongValue="-126" MinZoom="5"/> |
|
In the sample above, the Center and MinZoomValue properties are also set.
The following code will set the map boundaries, the map's center, and the zoom level on load. Add this to the InitializeComponent() method:
| C# |
Copy Code
|
|---|---|
maps.MaxLat = 44;
maps.MinLat = 32;
maps.MaxLong = -112;
maps.MinLong = -126;
maps.Center = new Point(-121.224, 37.8897);
maps.MinZoom = 5;
|
|
For reference, this is all the code used to create the following image. If you wish to copy the code, make sure that you replace YourProjectName in the namespace declaration with you project's namespace:
| C# |
Copy Code
|
|---|---|
namespace YourProjectName { public class City { public Point LongLat { get; set; } public string Name { get; set; } } public sealed partial class MainPage : Page { public MainPage() { this.InitializeComponent(); maps.MaxLatValue = 44; maps.MinLatValue = 32; maps.MaxLongValue = -112; maps.MinLongValue = -126; maps.Center = new Point(-121.224, 37.8897); maps.MinZoom = 5; City[] cities = new City[] { new City(){LongLat= new Point(-121.22361, 37.88972), Name="Stockton"}, new City(){LongLat= new Point(-117.1625, 32.7150), Name="San Diego"}, new City(){LongLat= new Point(-124.2017, 41.7558), Name="Crescent City"}, }; maps.DataContext = cities; } } } |
|
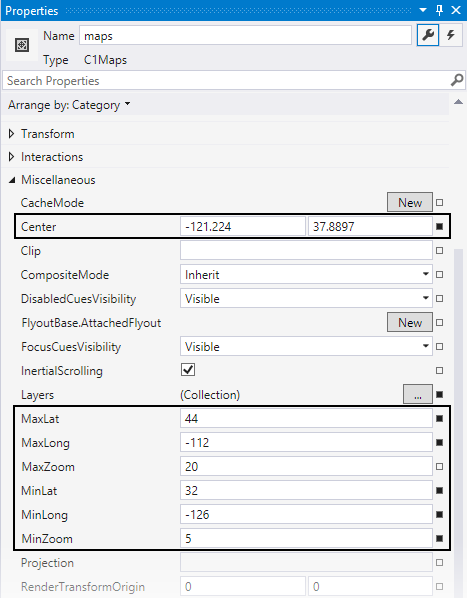
You can set the minimum and maximum latitude and longitude values, the Center property, and the MinZoomValue property in the Properties window.
The properties used to create the following map image are highlighted in the Properties window image. To set these properties in your application, just click in the textbox next to the property and enter the appropriate numbers:
The examples above will result in a map that resembles the following image:
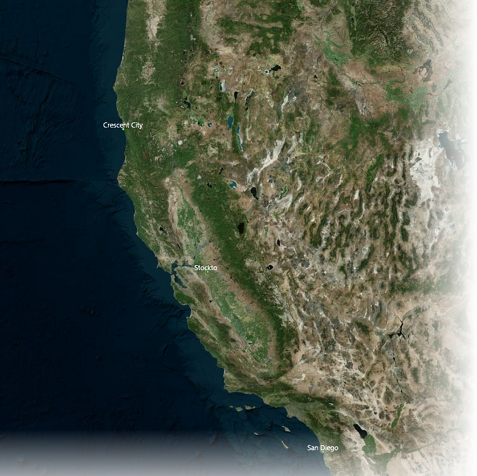
Note: In the image above, the cities were marked using code similar to that in the Quick Start. You can find all the code in the In Code tab in this topic. Remember that you'll need the following XAML markup added between your <C1:C1Maps> <C1:C1Maps/> tags to format and bind the collection of Cities to your C1Maps control:
| XAML |
Copy Code
|
|---|---|
<C1:C1Maps.Resources>
      <!--Item template-->
     <DataTemplate x:Key="templPts">
         <C1:C1VectorPlacemark GeoPoint="{Binding Path=LongLat}" Fill="LightGreen" Stroke="DarkGreen"
                               Label="{Binding Path=Name}" LabelPosition="Top" >
             <C1:C1VectorPlacemark.Geometry>
                 <EllipseGeometry RadiusX="2" RadiusY="2" />
             </C1:C1VectorPlacemark.Geometry>
         </C1:C1VectorPlacemark>
     </DataTemplate>
</C1:C1Maps.Resources>
 <C1:C1VectorLayer ItemsSource="{Binding}" ItemTemplate="{StaticResource templPts}"/>
|
|